
A Father’s Day menu that’s packed with flavor and will stick to your ribs
We are fortunate to take an extended family trip to WaterColor, Florida, every June. Both our families caravan there, along with our other sister, her children and our parents. It is a wonderful way to reconnect and spend quality time together cooking, relaxing and catching up. Because this trip always takes place in June, we also get to celebrate Father’s Day at the beach. This month, we thought it would be fun to share a simple make-ahead menu that we’ve enjoyed there, and you can enjoy with some of the special fathers and father figures in your life.
ON THE MENU:
• Beer-braised Barbecue Pork Loin in a pressure cooker
• Green Apple Coleslaw
• Three-cheese Shells and Cheese
• Ice Cream Pie
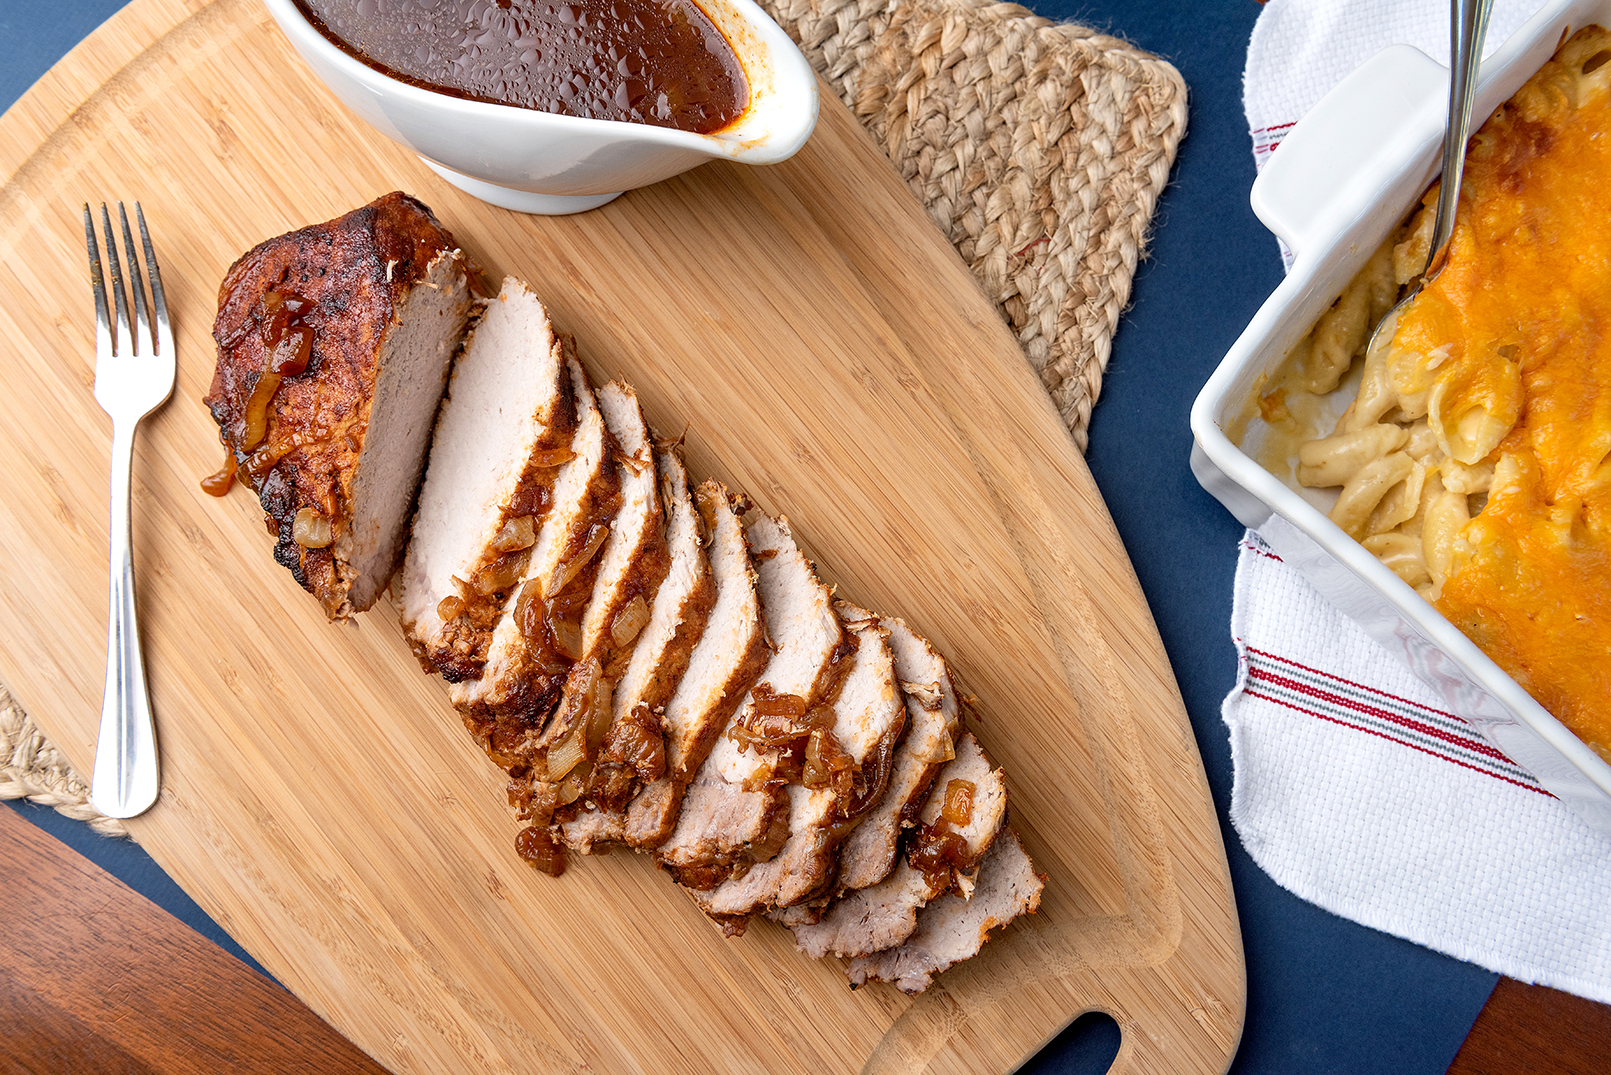
BEER-BRAISED BARBECUE PORK LOIN IN A PRESSURE COOKER
We love cooking pork loin for a crowd. It’s relatively inexpensive and foolproof to make. We have been cooking this Beer-braised Barbecue Pork Loin for years in a Dutch oven and braising it in the oven. Stephanie’s husband recently has gotten quite handy with the pressure cooker, and because this handy kitchen appliance is now enjoying a resurgence in culinary circles, we adapted our recipe for the pressure cooker. We also included instructions for the Dutch oven method. Both ways are equally easy and great for serving a crowd.
Servings: 6
3 tablespoons olive oil
2½-pound pork loin, trimmed
1½ teaspoon dried Mesquite rub
1 medium onion, chopped
6 ounces beer (we use a pilsner or lager)
½ cup sweet barbecue sauce
½ cup tangy barbecue sauce
1. Heat the oil in the bottom of a pressure cooker. Season the pork loin with the dry rub.
2. Brown the pork on all sides for 5 to 6 minutes.
3. Remove the pork and set it on a plate. Add the onions to the bottom of the cooker and sauté for 2 to 3 minutes.
4. Pour the beer over the onions and allow it to come to a boil. Pour the barbecue sauces into the mixture, and add the pork back in.
5. Close the pressure cooker and lock the lid. Set it to high. Once the pressure reaches high, reduce heat to low, and set a timer for 20 minutes.
6. After 20 minutes, use the natural release method to open the pressure cooker. This will allow the pressure to release slowly for about 10 to 15 minutes.
7. Once all the pressure is released, remove the pork loin and place it on a platter. Slice the pork and serve with the sauce leftover in the pressure cooker. If you want a sauce that is a little thicker, simmer over medium-high heat and reduce the sauce a bit.
To use the Dutch oven method:
Heat the oven to 350 degrees. Follow steps 1 to 4 above, using the Dutch oven over the stovetop instead of the pressure cooker. After you have added the pork back into the Dutch oven, place it into the heated oven and bake for 1 hour or until the pork is fork tender but not falling apart. Remove the pork from the Dutch oven and allow it to rest 5 to 10 minutes before slicing. Serve the slices with the remaining sauce.
GREEN APPLE COLESLAW
Two dishes that seem to really go well together are barbecue and coleslaw. There is something about the sweet yet savory elements of pork with barbecue sauce that is complemented by the tangy crunch of coleslaw. This Green Apple Coleslaw is one of our favorites, particularly because of the tart, crunchy apples and sweet dried cranberries. The dressing is not too creamy and has a little bite from apple cider vinegar.

Servings: 6
1 medium green apple, julienned
1 bag shredded cabbage
1 cup shredded carrots
¼ cup chopped green onions
1/³ cup dried cranberries
1 cup mayonnaise
¼ cup apple cider vinegar
¼ cup honey
¼ teaspoon salt
¼ teaspoon black pepper
¼ teaspoon onion powder
1/3 cup toasted sunflower seeds
1. Place the julienned apples, shredded cabbage, carrots, green onions and dried cranberries in a large mixing bowl.
2. In a separate mixing bowl, whisk together the mayonnaise, vinegar, honey, salt, pepper and onion powder, and pour it over the cabbage mixture. Toss to coat everything well.
3. Cover the green apple slaw and chill for at least 30 minutes before serving.
4. Before serving, taste to adjust the seasoning. Top with the toasted sunflower seeds.
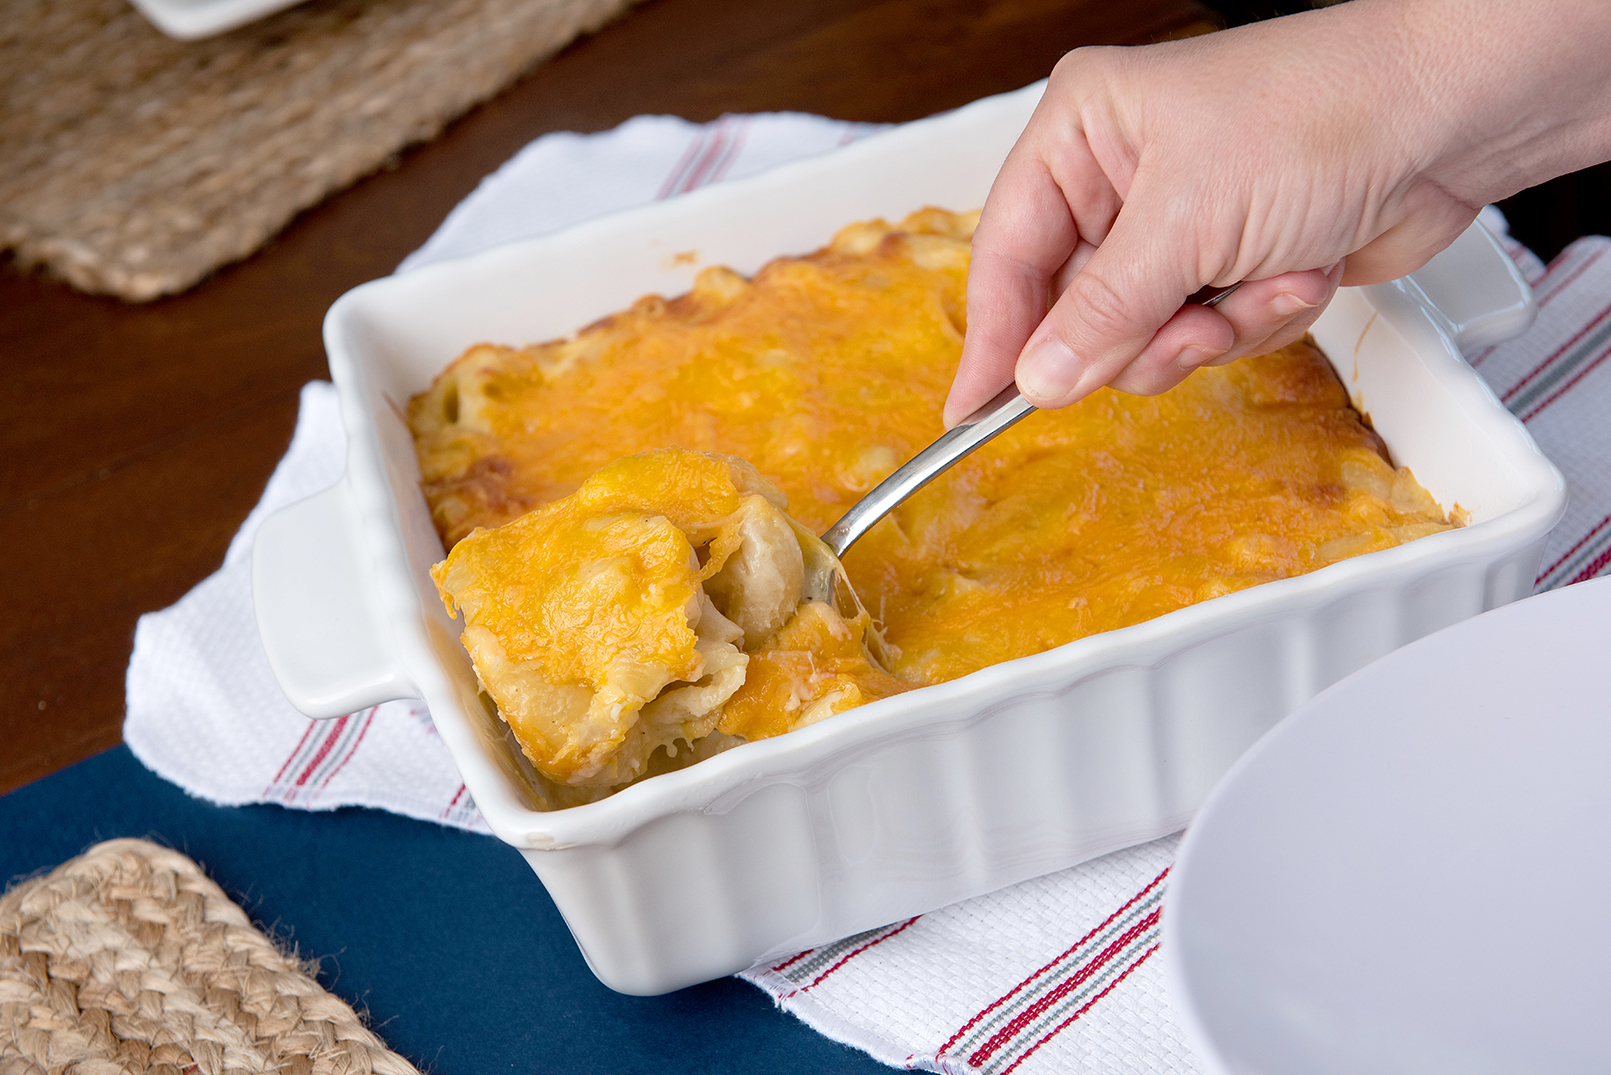
THREE-CHEESE SHELLS AND CHEESE
Shells and Cheese is the essence of comfort food and the perfect side to serve with a very manly menu. No plastic cheese in this recipe! It is the real deal. We like to use a blend of cheeses, including sharp cheddar, mozzarella and Parmesan, but feel free to change it up to suit your taste. We also like using shell-shaped pasta, but penne, rigatoni or large elbow macaroni work just as well. This is a great dish that can be made a day ahead, then assembled and put in the oven shortly before serving.
Servings: 6
1 16-ounce bag large shell pasta
3 tablespoons butter
3 tablespoons flour
4 cups whole or low-fat milk
2 cups sharp cheddar cheese
1 cup mozzarella cheese
½ cup shredded Parmesan
¼ teaspoon salt
¼ teaspoon black pepper
¼ teaspoon paprika
1. Boil the pasta according to package directions. Drain well and set aside.
2. In a sauce pot, melt the butter and add the flour. Cook 2-3 minutes. Whisk in the milk.
3. Keep whisking until smooth and the mixture begins to thicken. Fold in the cheeses (save half the sharp cheddar for the topping) and seasonings. Stir until everything is melted and smooth.
4. Heat the oven to 325 degrees. Spray a 9-by-13-inch casserole dish with cooking spray. Pour the cheese sauce over the shells and transfer into the prepared dish. Top with the remaining cup of sharp cheddar. Bake 12 to 14 minutes or just until the cheese is melted and bubbly.
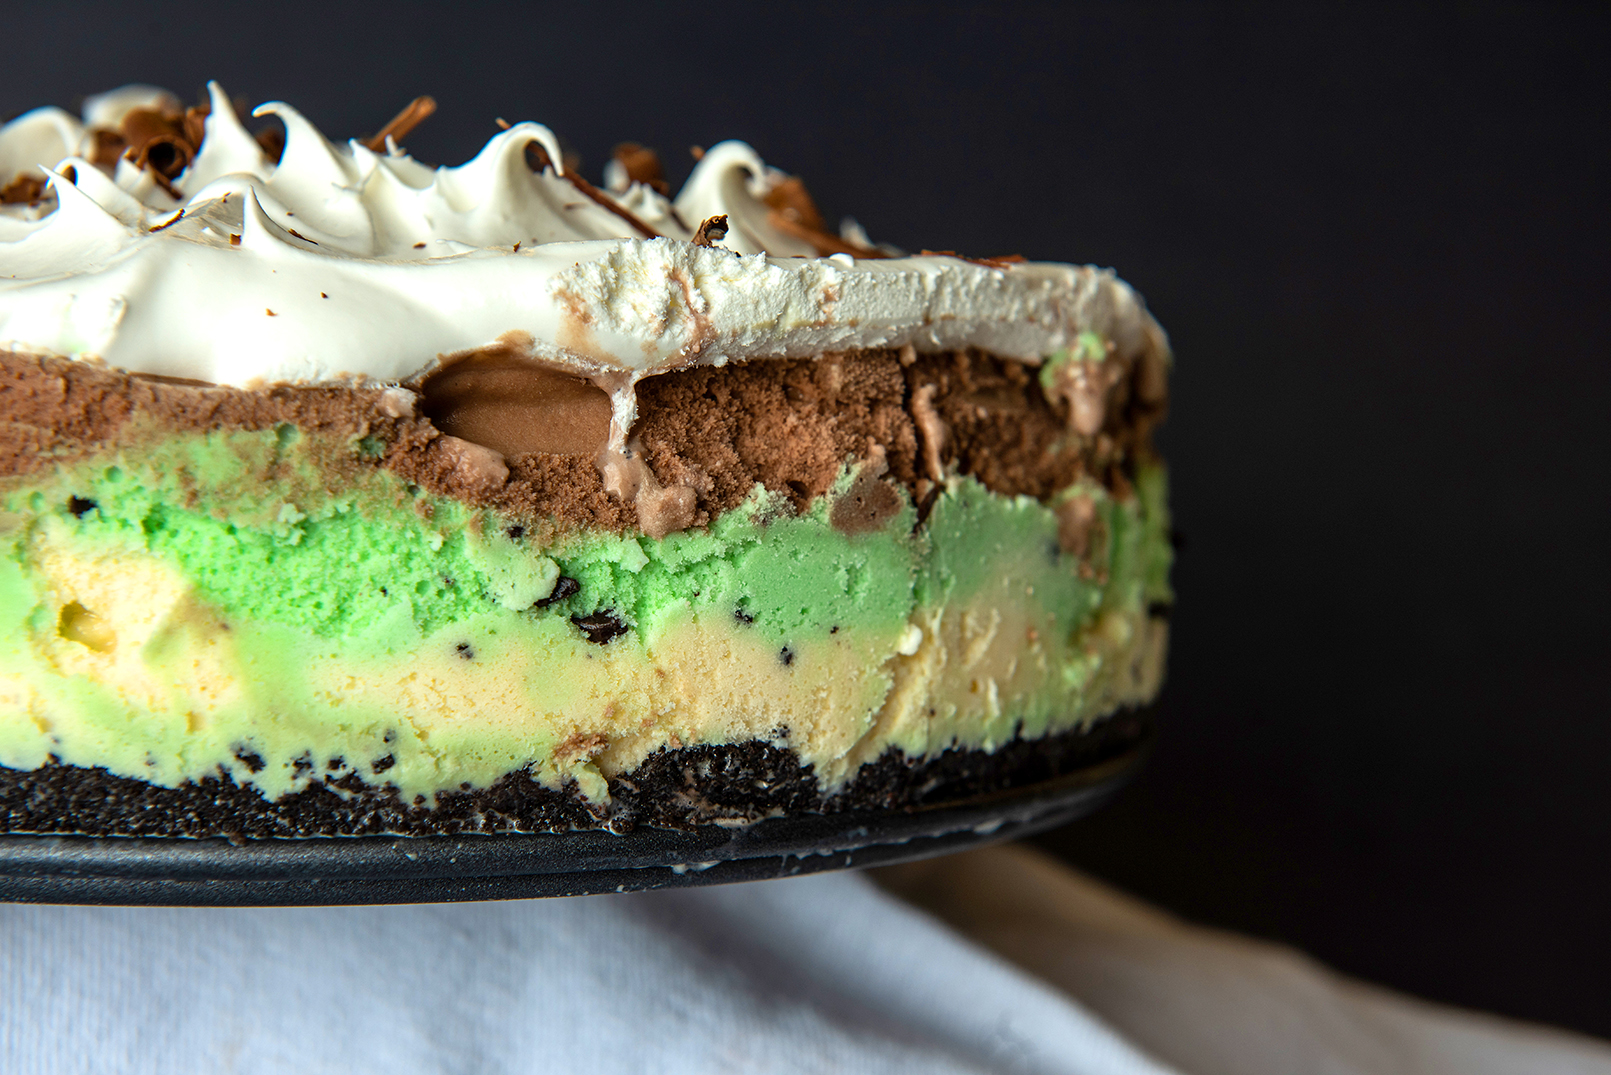
ICE CREAM PIE
Ice cream pies are great to make in the summer. They are a delicious treat and always a crowd pleaser. We love making our own Oreo crust, but feel free to use a store-bought variety if you are in a pinch. This recipe makes a large, deep 8-inch pie using a springform pan, so if you are using a store-bought crust this recipe will fill 2 pie shells. We like the combination of chocolate, vanilla, and mint chocolate ice cream, but you can change up the flavors to suit your family’s favorites. Whatever you have leftover will last in the freezer for up to 2 weeks.
Servings: 8-10
1 package Oreo Thins cookies
3 tablespoons melted butter
2 bags dark chocolate chips
1/3 cup milk
1 quart vanilla ice cream
1 quart mint chocolate ice cream
1 quart chocolate ice cream
1 cup whipped topping
Chocolate shavings and sprinkles
1. Heat the oven to 325 degrees. Use a food processor to crush up the Oreo Thins into crumbs.
2. Pour the crumbs into a mixing bowl and add the melted butter. Mix until everything is combined and the mixture resembles wet sand.
3. Press the cookie crumb mixture into an 8-inch springform pan. Bake the cookie crust for 10 to 12 minutes and remove from the oven. Allow the crust to cool completely.
4. In a microwave-safe dish, combine the chocolate chips and milk. Heat for 30-40 seconds. Remove the mixture from the microwave and stir. Place back into the microwave and heat for an additional 20 to 25 seconds, then stir until the chocolate is smooth and glossy.
5. Pour a thin layer of the chocolate ganache (save some for additional layers) over the crust and place it into the freezer for 30 minutes to set.
6. While the ganache sets, remove the vanilla ice cream from the freezer. Allow it to soften. Use an ice cream scooper to scoop the vanilla ice cream out and spread it on top of the ganache crust.
7. Drizzle a little more of the ganache over the vanilla ice cream. Place it back into the freezer to set for 30 to 45 minutes. (Note: If the ganache gets a little too cool to drizzle, you can warm it back up in the microwave for 10 seconds.)
8. Follow the same process for the mint chocolate ice cream and chocolate ice cream, allowing each to soften a bit before scooping and spreading over the previous layer. Follow each layer with a drizzle of ganache and a 30 to 40 minute rest in the freezer for the ganache to set.
9. Place the finished pie in the freezer for an hour before topping it with whipped topping. Freeze the pie overnight to make sure everything is set.
10. Before serving, remove the pie from the freezer and release the buckle on the side of the springform pan. Top the pie with chocolate shavings. Allow it to sit at room temperature for 5 minutes before slicing.
This article was originally published in the June 2018 issue of 225 Magazine.

